Contour Next EZ Quick Reference Guide
Contour®Next EZ
Blood Glucose Monitoring System
Online meter registration available at www.diabetes.ascensia.com or call our Customer Service.
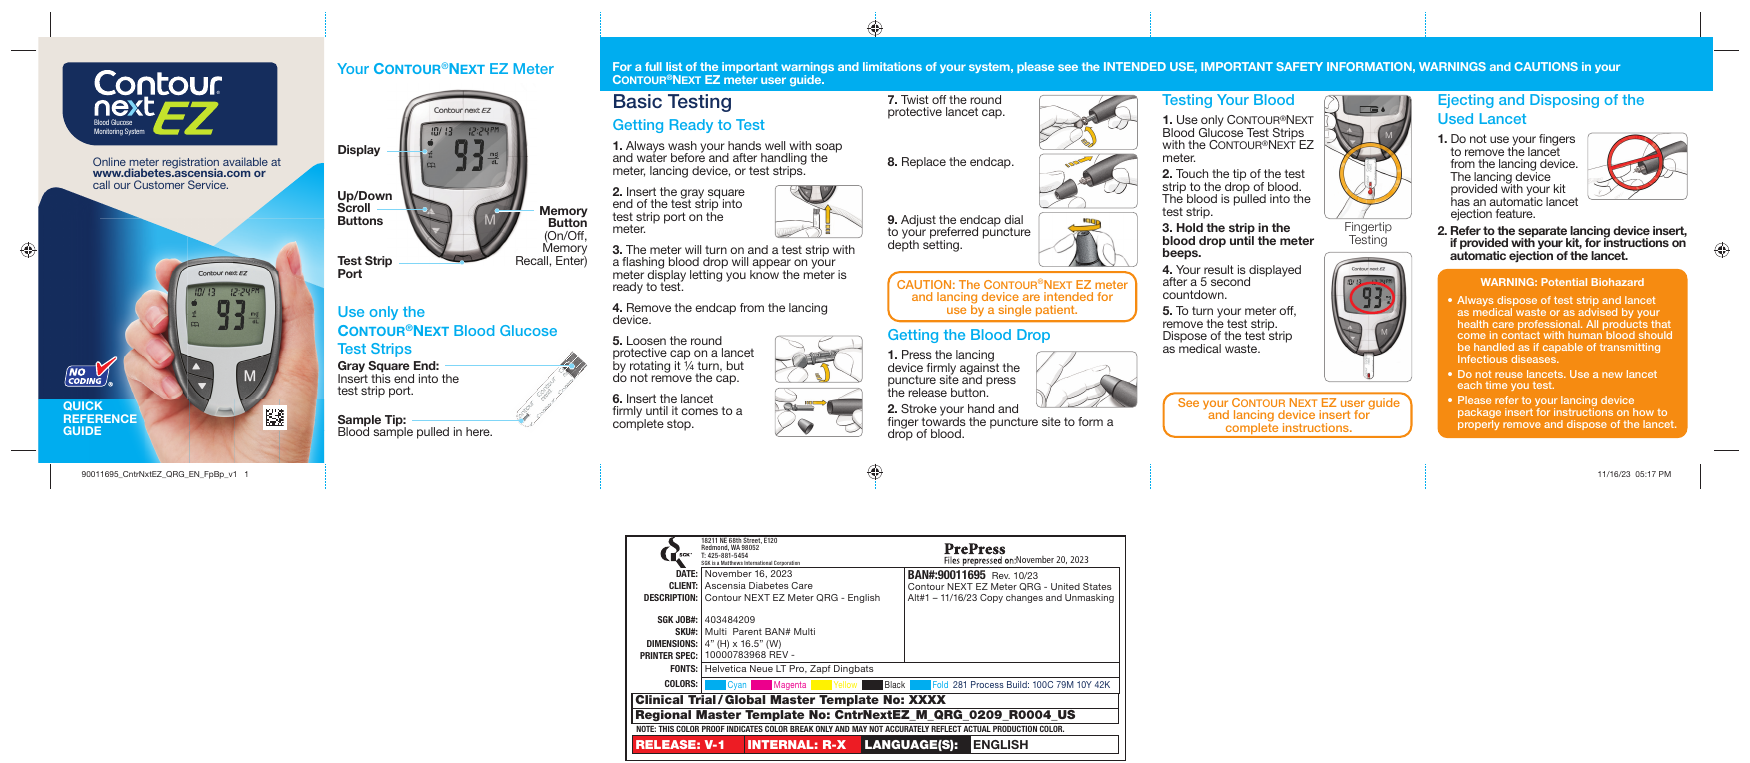
Your Contour®Next EZ Meter
For a full list of the important warnings and limitations of your system, please see the INTENDED USE, IMPORTANT SAFETY INFORMATION, WARNINGS and CAUTIONS in your Contour®Next EZ meter user guide.
Meter Parts
- Display — shows test results, prompts and messages.
- Up/Down Scroll Buttons — navigate menu options and settings.
- Memory Button (M) — turns meter on/off and recalls memory; serves as the Enter button.
- Test Strip Port — insert the gray square end of the test strip here.
Use only Contour®Next Blood Glucose Test Strips:
- Gray Square End: Insert this end into the test strip port.
- Sample Tip: Blood sample pulled in here.
Basic Testing
Getting Ready to Test
- Always wash your hands well with soap and water before and after handling the meter, lancing device, or test strips.
- Insert the gray square end of the test strip into the test strip port on the meter.
- The meter will turn on and a test strip with a flashing blood drop will appear on your meter display letting you know the meter is ready to test.
- Remove the endcap from the lancing device.
- Loosen the round protective cap on a lancet by rotating it ¼ turn, but do not remove the cap.
- Insert the lancet firmly until it comes to a complete stop.
- Twist off the round protective lancet cap.
- Replace the endcap.
- Adjust the endcap dial to your preferred puncture depth setting.
The Contour®Next EZ meter and lancing device are intended for use by a single patient.
Getting the Blood Drop
- Press the lancing device firmly against the puncture site and press the release button.
- Stroke your hand and finger towards the puncture site to form a drop of blood.
Testing Your Blood
- Use only Contour®Next Blood Glucose Test Strips with the Contour®Next EZ meter.
- Touch the tip of the test strip to the drop of blood. The blood is pulled into the test strip.
- Hold the strip in the blood drop until the meter beeps.
- Your result is displayed after a 5 second countdown.
- To turn your meter off, remove the test strip. Dispose of the test strip as medical waste.
See your Contour®Next EZ user guide and lancing device insert for complete instructions.
Ejecting and Disposing of the Used Lancet
- Do not use your fingers to remove the lancet from the lancing device. The lancing device provided with your kit has an automatic lancet ejection feature.
- Refer to the separate lancing device insert, if provided with your kit, for instructions on automatic ejection of the lancet.
- Always dispose of test strip and lancet as medical waste or as advised by your health care professional. All products that come in contact with human blood should be handled as if capable of transmitting infectious diseases.
- Do not reuse lancets. Use a new lancet each time you test.
- Please refer to your lancing device package insert for instructions on how to properly remove and dispose of the lancet.
Potential Biohazard
- All blood glucose measuring systems are considered biohazardous.
- All products or objects which come in contact with human blood, even after cleaning, should be handled as if capable of transmitting infectious diseases.
- The meter and lancing device are for single patient use. Do not share them with anyone including other family members!
- All parts of the kit are considered biohazardous and can potentially transmit infectious diseases, even after you have performed cleaning and disinfection.
- Always wash your hands well with soap and water and dry them well before and after handling the meter, lancing device, or test strip.
See your user guide for complete instructions.
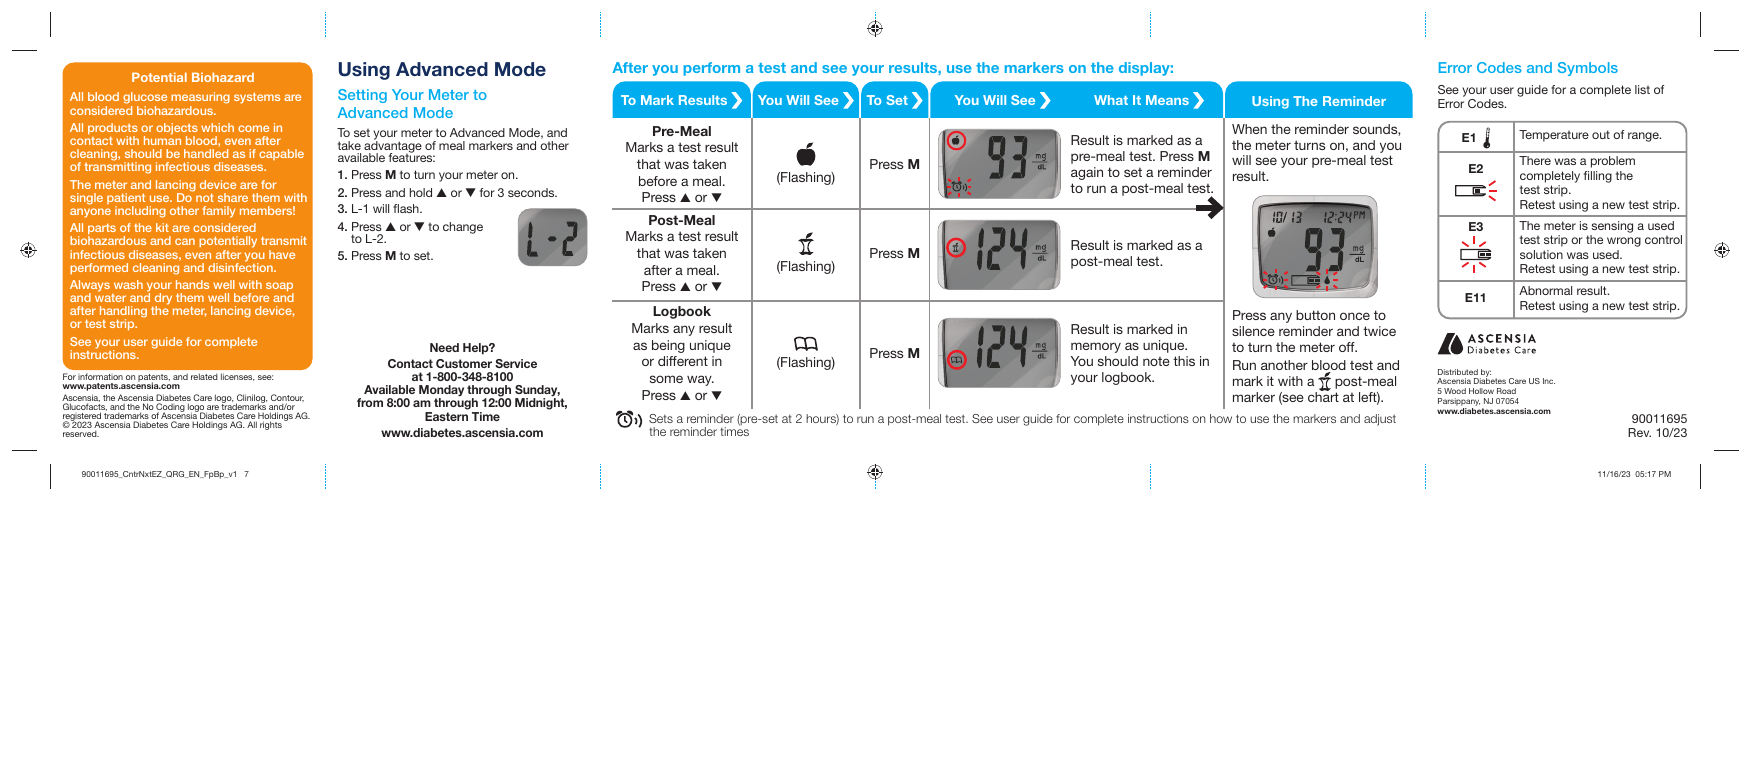
Using Advanced Mode
Setting Your Meter to Advanced Mode
To set your meter to Advanced Mode, and take advantage of meal markers and other available features:
- Press M to turn your meter on.
- Press and hold ▲ or ▼ for 3 seconds.
- L-1 will flash.
- Press ▲ or ▼ to change to L-2.
- Press M to set.
Marking Test Results
After you perform a test and see your results, use the markers on the display:
| To Mark Results | Steps | What It Means |
|---|---|---|
| Pre-Meal — marks a test result that was taken before a meal. | Press M (flashing). Press ▲ or ▼. | Result is marked as a pre-meal test. Press M again to set a reminder to run a post-meal test. |
| Post-Meal — marks a test result that was taken after a meal. | Press M (flashing). Press ▲ or ▼. | Result is marked as a post-meal test. |
| Logbook — marks any result as being unique or different in some way. | Press M (flashing). Press ▲ or ▼. | Result is marked in memory as unique. You should note this in your logbook. |
See user guide for complete instructions on how to use the markers and adjust the reminder times.
Using the Reminder
Sets a reminder (pre-set at 2 hours) to run a post-meal test. When the reminder sounds, the meter turns on, and you will see your pre-meal test result.
Press any button once to silence reminder and twice to turn the meter off. Run another blood test and mark it with a post-meal marker (see chart above).
Error Codes and Symbols
See your user guide for a complete list of Error Codes.
| Code | Meaning | Action |
|---|---|---|
| E1 | Temperature out of range. | — |
| E2 | There was a problem completely filling the test strip. | Retest using a new test strip. |
| E3 | The meter is sensing a used test strip or the wrong control solution was used. | Retest using a new test strip. |
| E11 | Abnormal result. | Retest using a new test strip. |
Need Help? Contact Customer Service
Customer Service: 1-800-348-8100
Available Monday through Sunday, from 8:00 am through 12:00 Midnight, Eastern Time.
Distributed by:
Ascensia Diabetes Care US Inc.
5 Wood Hollow Road
Parsippany, NJ 07054
www.diabetes.ascensia.com
For information on patents, and related licenses, see: www.patents.ascensia.com
Trademarks: Ascensia, the Ascensia Diabetes Care logo, Clinilog, Contour, Glucofacts, and the No Coding logo are trademarks and/or registered trademarks of Ascensia Diabetes Care Holdings AG.
Prefer to print or save offline?
Download CONTOUR® NEXT EZ Quick Reference Guide (PDF)