Contour Next ONE Quick Reference Guide
Contour®Next ONE
Blood Glucose Monitoring System
Works with free Contour®Diabetes app.
Warranty information and online meter registration available at www.diabetes.ascensia.com or call our Customer Service.
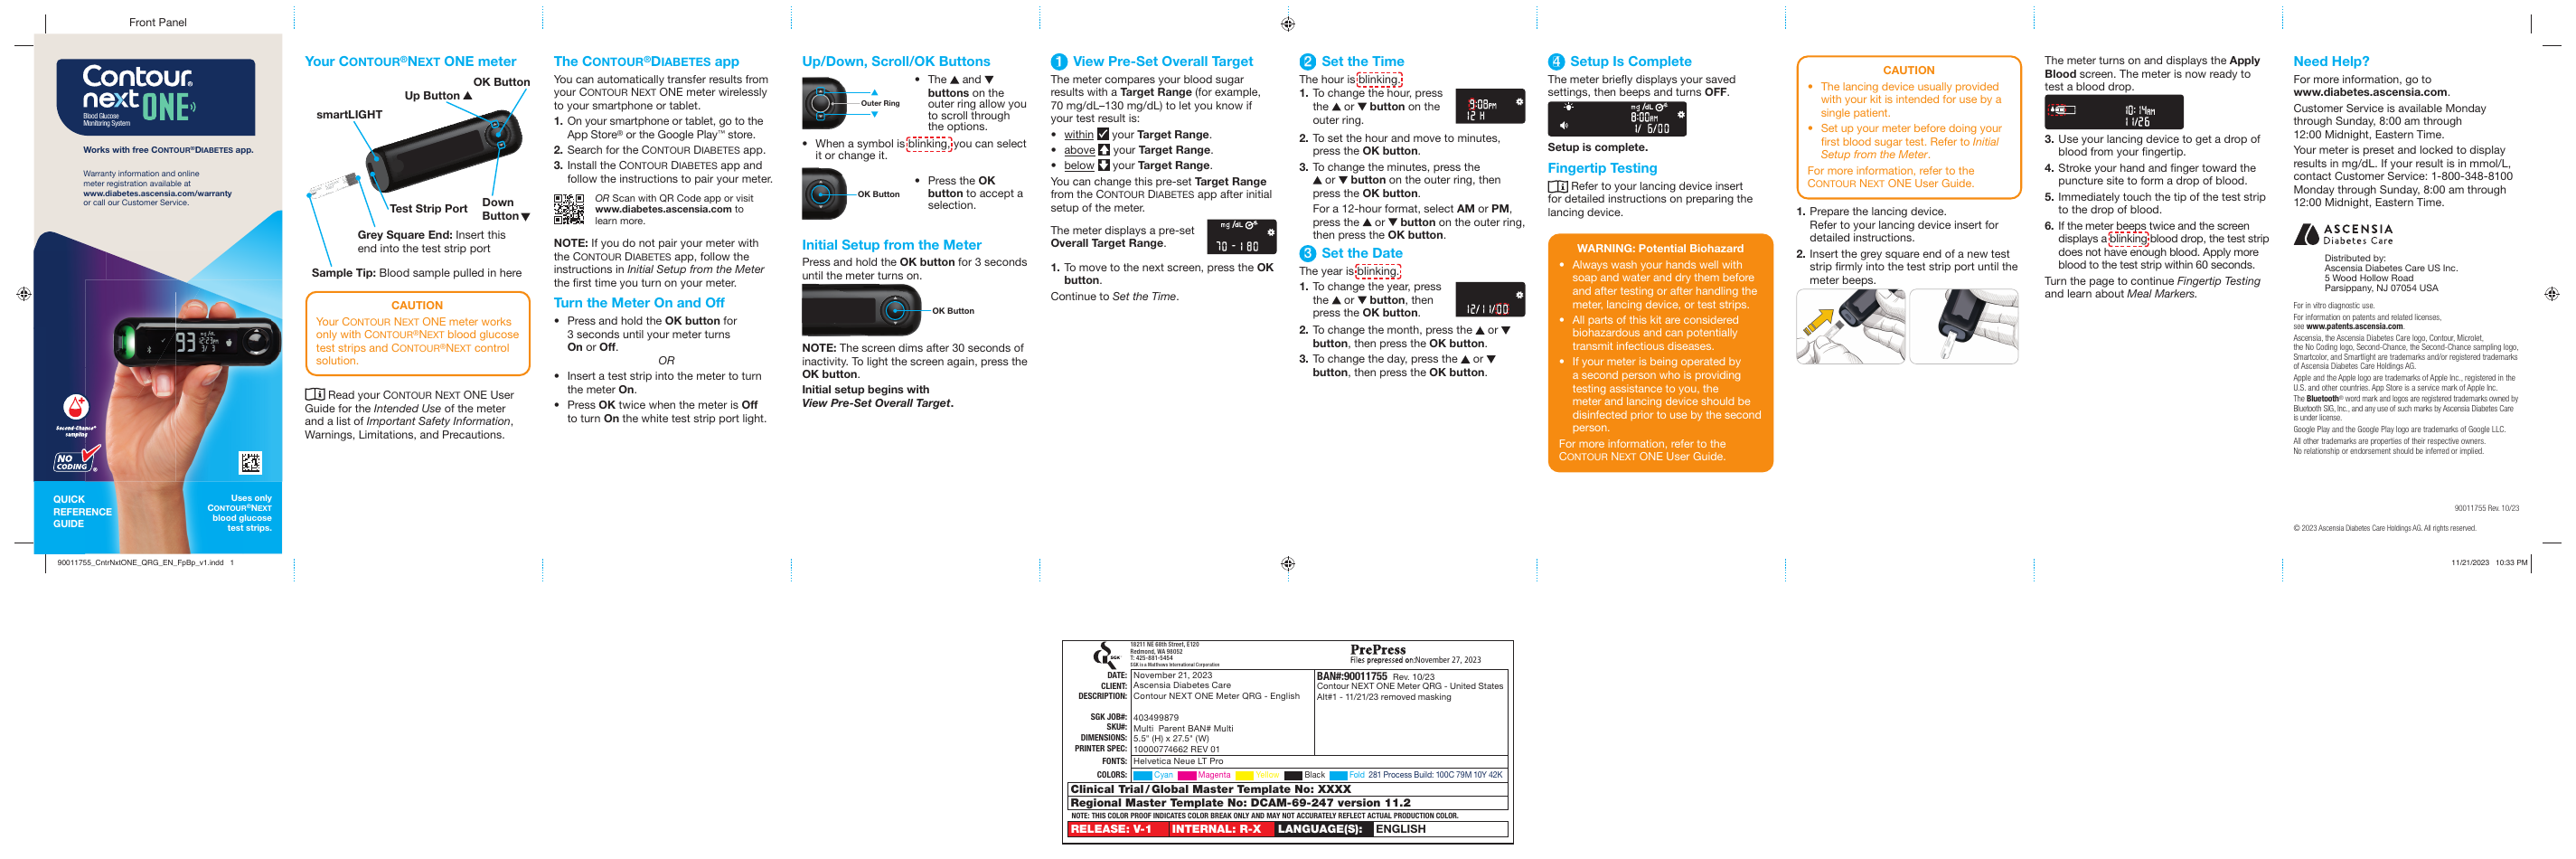
Your Contour®Next ONE Meter
Front Panel
- OK Button — selects, confirms, and turns the meter on/off (press and hold).
- Up Button / Down Button — navigate menu options and settings.
- Outer Ring (Up/Down, Scroll/OK Buttons) — allows you to scroll through the options. When a symbol is blinking, you can select it or change it.
- Test Strip Port — insert the gray square end of the Contour®Next test strip here.
- smartLIGHT Indicator — visual color-coded feedback on whether your reading is within, above, or below your Target Range.
For a full list of the important warnings and limitations of your system, please see the INTENDED USE, IMPORTANT SAFETY INFORMATION, WARNINGS and CAUTIONS in your Contour®Next ONE meter user guide.
The Contour®Diabetes App
You can automatically transfer results from your Contour®Next ONE meter wirelessly to your smartphone or tablet.
- On your smartphone or tablet, go to the App Store® or the Google Play™ store.
- Search for the Contour®Diabetes app.
- Install the Contour®Diabetes app and follow the instructions to pair your meter.
Initial Setup
1. View Pre-Set Overall Target
The meter compares your blood sugar results with a Target Range (for example, 70 mg/dL–130 mg/dL) to let you know if your test result is:
- within your Target Range,
- above your Target Range, or
- below your Target Range.
You can change this pre-set Target Range. Press the OK button. Use the ▲ or ▼ button on the outer ring to change.
2. Set the Time
The hour is blinking.
- To change the hour, press the ▲ or ▼ button on the outer ring.
- To set the hour and move to minutes, press the OK button.
- To change the minutes, press the ▲ or ▼ button on the outer ring, then press OK.
3. Set the Date
Follow the on-screen prompts to set the year, month, and day. Use the outer ring to adjust each value, and press OK to confirm.
4. Setup Is Complete
The meter briefly displays your saved settings, then beeps and turns OFF. The meter turns on and displays the Apply Blood screen. The meter is now ready to test a blood drop.
- The lancing device usually provided with your kit is intended for use by a single patient.
- Set up your meter before doing your first blood sugar test. Refer to Initial Setup from the Meter for more information.
Fingertip Testing
- Always wash your hands well with soap and water before and after handling the meter, lancing device, or test strips.
- Insert the gray square end of the Contour®Next test strip into the test strip port. The meter turns on. The Apply Blood screen appears.
- Use your lancing device to get a drop of blood from your fingertip.
- Stroke your hand and finger toward the puncture site to form a drop of blood.
- Touch the tip of the test strip to the drop of blood. The blood is pulled into the test strip.
- Hold the strip in the blood drop until the meter beeps.
- Your result appears after the countdown.
Your meter is preset and locked to display results in mg/dL. If your result is in mmol/L, contact Customer Service.
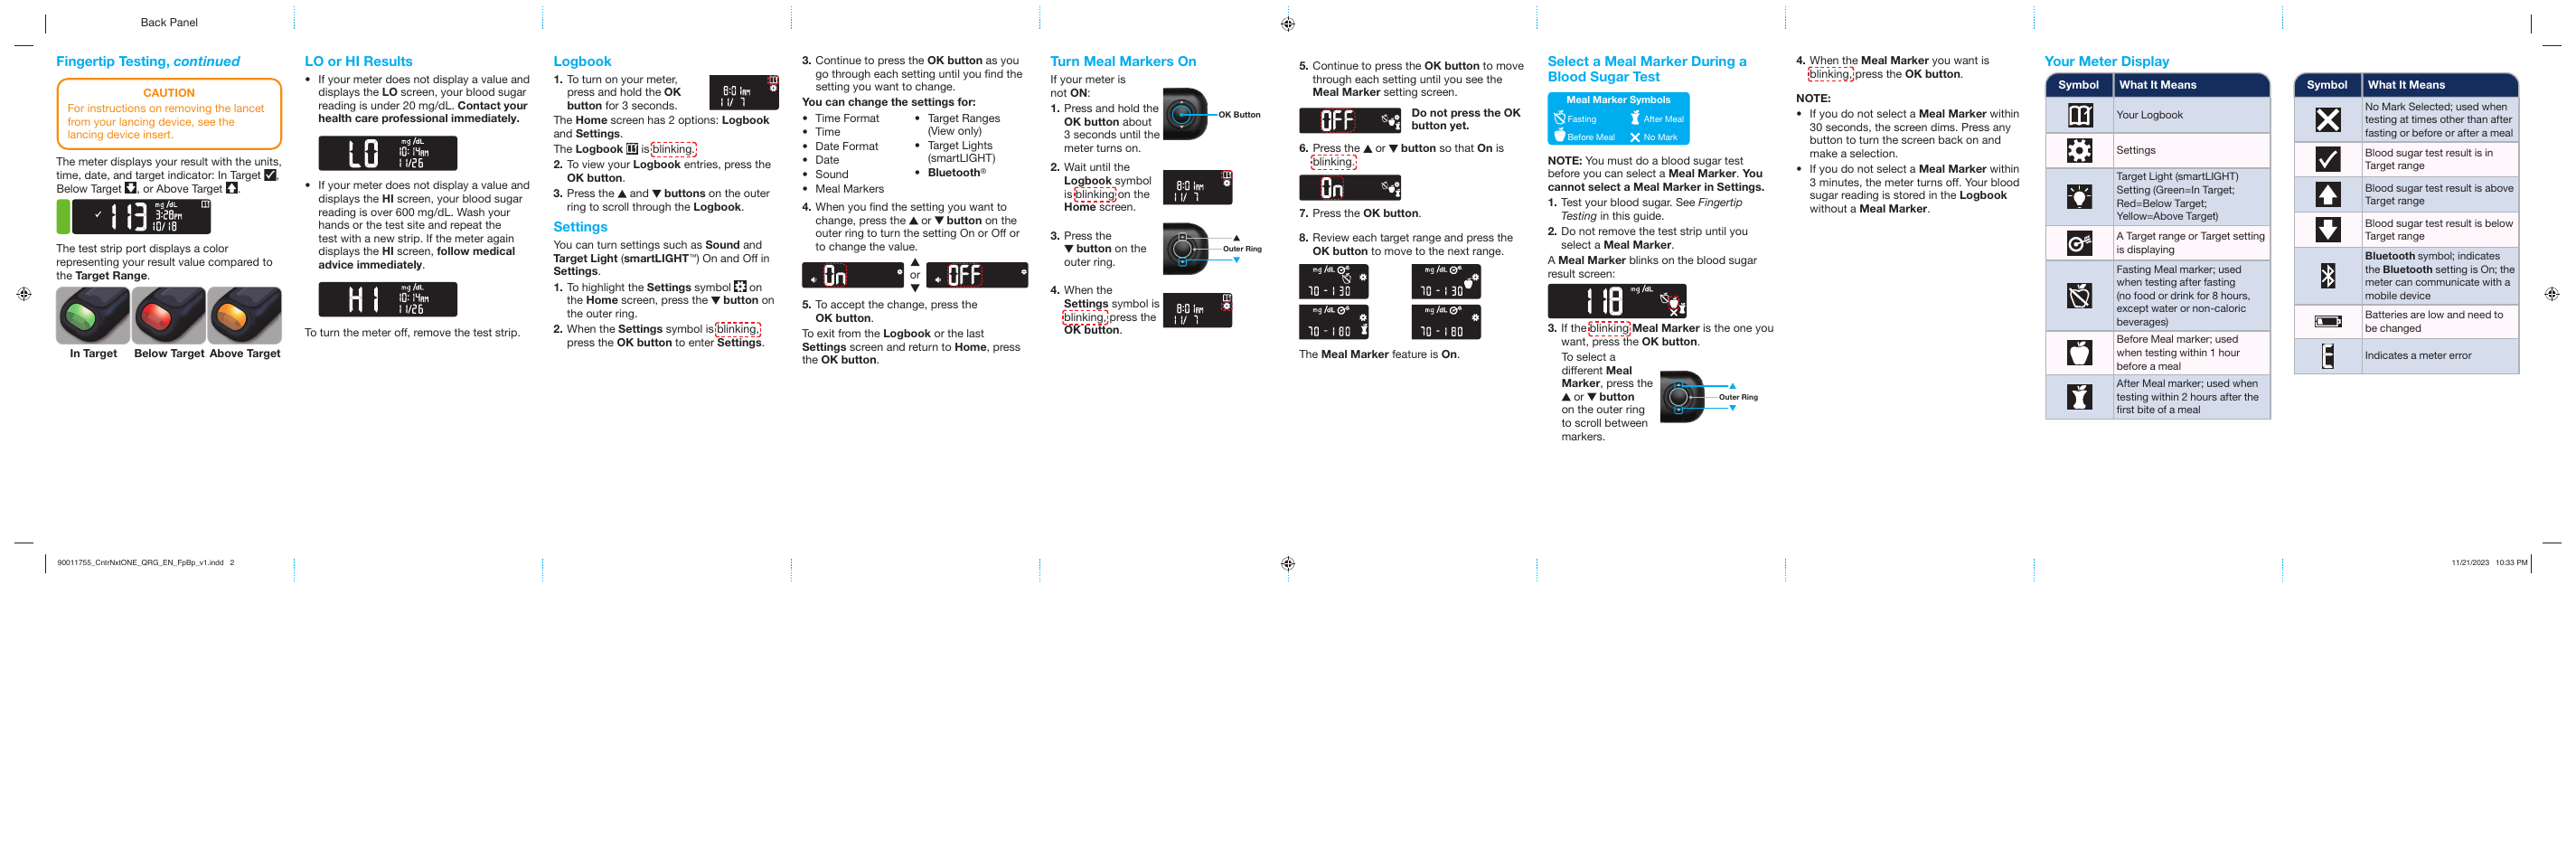
smartLIGHT Target Range Indicator
After your test, the smartLIGHT indicator illuminates with one of three colors to give you immediate feedback on your blood glucose result:
| Color | Meaning |
|---|---|
| Green | Result is within your Target Range. |
| Yellow | Result is above your Target Range. |
| Red | Result is below your Target Range. |
Setting a Meal Marker
You can mark your test result as taken before a meal (Pre-Meal) or after a meal (Post-Meal) so you can review your results in context later.
- After your test result is shown, press the OK button.
- Use the outer ring to highlight Pre-Meal or Post-Meal, then press OK to set the marker.
- The meter saves your result with the meal marker.
Logbook and Averages
Your meter automatically stores your test results with the date, time, and any markers you have applied. To review:
- From the Main Menu, use the outer ring to highlight Logbook or My Averages.
- Press OK to view your stored results or your average for selected periods (e.g., 7-day, 14-day, 30-day, 90-day).
Setting a Test Reminder
You can set the meter to remind you to test at a specific time after a meal.
- From the Main Menu, highlight Reminder and press OK.
- Use the outer ring to set the time interval (typically 1–3 hours).
- Press OK to confirm.
When the reminder time arrives, the meter will alert you. Press any button to silence the reminder.
Error Codes and Symbols
See your user guide for a complete list of Error Codes.
| Code | Meaning | Action |
|---|---|---|
| E1 | Temperature out of range. | Move meter to operating range and retest. |
| E2 | There was a problem completely filling the test strip. | Retest using a new test strip. |
| E3 | The meter is sensing a used test strip or the wrong control solution was used. | Retest using a new test strip. |
| E11 | Abnormal result. | Retest using a new test strip. |
- Always dispose of test strip and lancet as medical waste or as advised by your health care professional. All products that come in contact with human blood should be handled as if capable of transmitting infectious diseases.
- Do not reuse lancets. Use a new lancet each time you test.
- The meter and lancing device are intended for use by a single patient. Do not share with anyone, including other family members.
Need Help? Contact Customer Service
For more information, go to www.diabetes.ascensia.com.
Customer Service: 1-800-348-8100
Available Monday through Sunday, 8:00 am through 12:00 Midnight, Eastern Time.
Distributed by:
Ascensia Diabetes Care US Inc.
5 Wood Hollow Road
Parsippany, NJ 07054
www.diabetes.ascensia.com
For information on patents, and related licenses, see: www.patents.ascensia.com
Trademarks: Apple, the Apple logo, and the App Store are trademarks of Apple Inc. Google Play and the Google Play logo are trademarks of Google LLC. Bluetooth® word mark and logos are registered trademarks owned by Bluetooth SIG, Inc. Ascensia, the Ascensia Diabetes Care logo, Clinilog, Contour, the No Coding logo, smartLIGHT, and Second-Chance are trademarks and/or registered trademarks of Ascensia Diabetes Care Holdings AG.
Prefer to print or save offline?
Download CONTOUR® NEXT ONE Quick Reference Guide (PDF)