Contour Next ONE User Guide (Pamphlet)
Blood Glucose Monitoring System
Works with free Contour®Diabetes app.
Warranty information and online meter registration available at www.diabetes.ascensia.com/warranty or call our Customer Service.
Uses only Contour®Next blood glucose test strips.
USER GUIDE
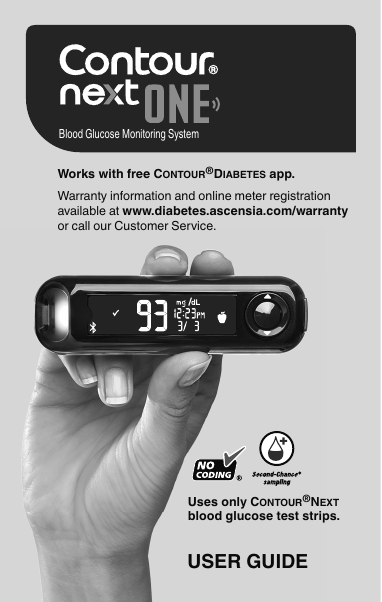
Table of Contents
Intended Use
The Contour®Next ONE blood glucose monitoring system is intended for the quantitative measurement of glucose in fresh capillary whole blood drawn from the fingertips. It is intended to be used by a single person and should not be shared. The system is intended for self-testing outside the body (in vitro diagnostic use) by people with diabetes at home as an aid in monitoring the effectiveness of a diabetes control program.
The Contour®Next ONE blood glucose monitoring system should not be used for the diagnosis of or screening for diabetes or for neonatal use. The Contour®Next blood glucose test strips are for use with the meter to quantitatively measure glucose in fresh capillary whole blood drawn from the fingertips.
The Contour®Next ONE blood glucose meter is not intended for use with Alternative Site Testing (AST).
NOTE: This document uses the term ‘blood glucose’ to mean ‘blood sugar’.
Important Safety Information
If your blood glucose reading is under the critical level you have established with your health care professional, follow their advice immediately.
If your blood glucose reading is over the recommended limit set by your health care professional:
- Wash and dry your hands well.
- Retest with a new strip.
If you get a similar result, follow your health care professional's advice immediately.
- Read your Contour®Next ONE user guide, the lancing device insert, and all instructional materials provided in your meter kit before testing.
- Examine the product for missing, damaged, or broken parts. If the test strip packaging is open or damaged, do not use those test strips.
- Whenever the meter is moved from one location to another, allow approximately 20 minutes for the meter to adjust to the new temperature before testing.
- The meter and lancing device are for single patient use. Do not share with anyone, including other family members.
1. Getting Started
Your Contour®Next ONE Meter
Thank you for choosing the Contour®Next ONE blood glucose monitoring system. We are proud to be your partner in helping you manage your diabetes.
Key meter components (front panel):
- OK Button — selects, confirms, and turns the meter on/off (press and hold).
- Up Button / Down Button — navigate menu options and settings.
- Outer Ring (Up/Down, Scroll/OK) — allows you to scroll through options. When a symbol is blinking, you can select or change it.
- Test Strip Port — insert the gray square end of the Contour®Next test strip here.
- smartLIGHT Indicator — color-coded feedback on whether your reading is within, above, or below your Target Range.
Meter Symbols and the Apply Blood Screen
| Symbol | What It Means |
|---|---|
| Apply Blood | The meter is ready for you to apply a blood drop to the test strip. |
| Bluetooth® | Indicates the Bluetooth feature is on. |
| Pre-Meal | Test result was taken before a meal. |
| Post-Meal | Test result was taken after a meal. |
| Fasting | Test result was taken in a fasting state. |
| Reminder | A reminder is set. |
| Battery | Battery is low. |
| smartLIGHT (Green) | Within Target Range. |
| smartLIGHT (Yellow) | Above Target Range. |
| smartLIGHT (Red) | Below Target Range. |
If there are missing characters or if the strip port light is a color you do not recognize, see the Error Messages section.
Initial Setup
1. View Pre-Set Overall Target
The meter compares your blood sugar results with a Target Range (for example, 70 mg/dL–130 mg/dL). You can change this pre-set Target Range at any time. Press the OK button to view; use ▲ or ▼ on the outer ring to change.
2. Set the Time
The hour is blinking.
- To change the hour, press the ▲ or ▼ button on the outer ring.
- To set the hour and move to minutes, press the OK button.
- To change the minutes, press the ▲ or ▼ button on the outer ring, then press OK.
3. Set the Date
Follow the on-screen prompts to set the year, month, and day. Use the outer ring to adjust each value, and press OK to confirm.
4. Setup Is Complete
The meter briefly displays your saved settings, then beeps and turns OFF. The meter turns on and displays the Apply Blood screen. The meter is now ready to test a blood drop.
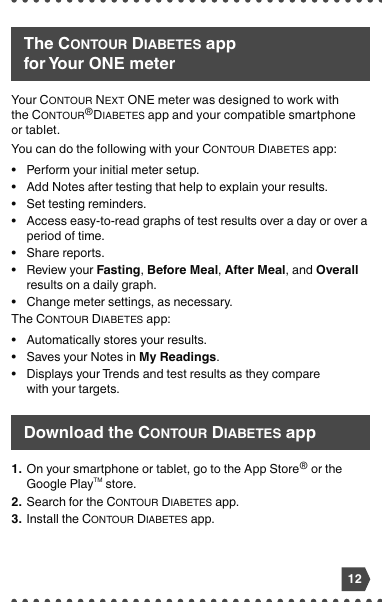
Download the Contour®Diabetes App
You can automatically transfer results from your meter wirelessly to your smartphone or tablet.
- On your smartphone or tablet, go to the App Store® or Google Play™ store.
- Search for the Contour®Diabetes app.
- Install the app and follow the instructions to pair your meter.
See Put your meter in pairing mode below.
2. Testing
Symptoms of High / Low Blood Glucose (Sugar)
Low blood glucose (Hypoglycemia): may include symptoms such as anxiety, shaking, sweating, headache, increased hunger, dizziness, pale skin, sudden mood change or irritability, fatigue, difficulty concentrating, clumsiness, sudden hunger, palpitations.
High blood glucose (Hyperglycemia): may include symptoms such as increased thirst, increased urination, blurred vision, fatigue, drowsiness, frequent infections, slow healing.
Talk with your health care professional if you experience any of these symptoms.
Fingertip Testing
- Wash your hands and the puncture site with warm, soapy water. Rinse and dry well.
- Insert the gray square end of the Contour®Next test strip into the test strip port. The meter turns on and displays the Apply Blood screen.
- See the lancing device insert for detailed instructions on preparing your lancing device.
- Press the lancing device firmly against the puncture site and press the release button.
- Stroke your hand and finger toward the puncture site to form a drop of blood.
- Touch the tip of the test strip to the drop of blood. The blood is pulled into the test strip.
- Hold the strip in the drop until the meter beeps.
- Your result is displayed.
- The lancing device usually provided with your kit is intended for use by a single patient.
- Set up your meter before doing your first blood sugar test.
Add a Meal Marker to a Blood Glucose Result
You can mark your test result for context to make tracking and review easier.
- Pre-Meal — result was taken before a meal.
- Post-Meal — result was taken after a meal.
- Fasting — result was taken in a fasting state.
To add a marker, press the OK button after your test result is shown, then use the outer ring to highlight the marker, and press OK again to apply.
The smartLIGHT Target Range Indicator
If the Target Light (smartLIGHT) setting is On, the test strip port lights up in one of three colors after each test:
| Color | Meaning |
|---|---|
| Green | Within Target Range. |
| Yellow | Above Target Range. |
| Red | Below Target Range. |
Understand Test Results
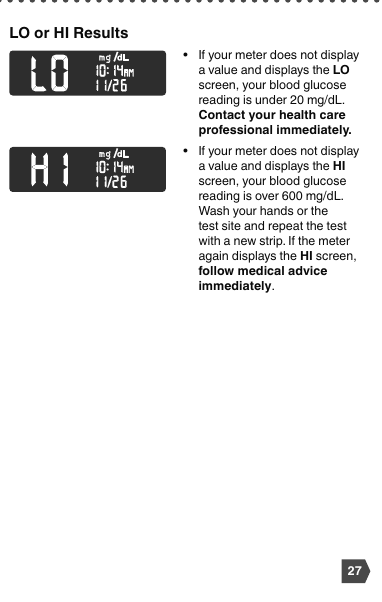
Expected Test Result Values: Blood sugar values vary depending on food intake, medication dosages, health, stress, or activity. Non-diabetic plasma glucose concentrations should be < 100 mg/dL in the fasting state and < 140 mg/dL in the post-prandial state. Consult with your health care professional for glucose values specific to your needs.
If your blood glucose result is below target (Hypoglycemia / Red Light), follow your health care professional's advice immediately.
3. Logbook
View Test Results and Blood Glucose Averages
Your meter automatically stores your test results with the date, time, and any markers you have applied.
- From the Main Menu, use the outer ring to highlight Logbook or My Averages.
- Press OK to view your stored results or your averages for selected periods (e.g., 7-day, 14-day, 30-day, 90-day).
4. Settings
Change the Time and Date
From the Main Menu, highlight Settings > Time/Date, press OK, and use the outer ring to adjust each value. Press OK after each value to confirm and move to the next.
Turn Off Sound
From the Main Menu, highlight Settings > Sound, press OK, and select On or Off using the outer ring.
Turn On/Off Meal Marker Feature
From the Main Menu, highlight Settings > Meal Marker, press OK, and select On or Off.
Turn On/Off Reminder Feature
From the Main Menu, highlight Settings > Reminder, press OK, and select On or Off. When On, set the time interval (typically 1–3 hours).
Change Target Ranges
You can set personal Pre-Meal, Post-Meal, Fasting, and Overall Target Ranges. From the Main Menu, highlight Settings > Target Range, then choose the range type and adjust using the outer ring.
Turn Off the smartLIGHT Target Range Indicator
From the Main Menu, highlight Settings > Target Light, press OK, and select On or Off.
Turn On/Off Bluetooth Feature
From the Main Menu, highlight Settings > Bluetooth, press OK, and select On or Off.
Put Your Meter in Pairing Mode
- Open the Contour®Diabetes app on your smartphone or tablet.
- Follow the in-app instructions to begin pairing.
- On your meter, navigate to Settings > Pair and press OK. Your meter is now discoverable.
- Confirm the pairing on your phone or tablet when prompted.
5. Help
Clean and Disinfect Your Meter
Cleaning is the removal of visible dirt and debris but does not kill germs. Disinfection kills most germs that may cause disease. The meter and lancing device should be cleaned and disinfected at least once per week.
- Hold the meter with the test strip port facing down to keep liquid out.
- Wipe the outside of the meter with a slightly damp lint-free cloth and a mild detergent solution.
- Make sure no liquid enters the test strip port, the data port, or any opening in the meter.
- Dry the meter with a dry, clean lint-free cloth.
Refer to the lancing device insert for the specific cleaning and disinfection procedure recommended for your device.
Replace Meter Batteries
Your Contour®Next ONE meter uses one 3-volt lithium battery (CR2032). When the battery icon appears or stays on the display, replace the battery promptly.
- Make sure your meter is off.
- Open the battery door on the back of the meter.
- Remove the old battery and replace it with a new one, positive (+) side up.
- Close the battery door securely.
After changing the battery, verify the date and time settings.
Test with Control Solution
Run a control solution test:
- When you use your meter for the first time;
- When you open a new bottle or package of test strips;
- If you suspect that the meter or test strips are not working properly;
- If you have repeated unexpected blood glucose results;
- If you drop the meter.
- Insert a test strip into the meter as you would for a blood glucose test.
- Shake the control solution bottle well, about 15 times, before each use.
- Squeeze a small drop of control solution onto a clean, nonabsorbent surface. Do not apply control solution directly to your fingertip or to the test strip from the bottle.
- Touch the tip of the test strip to the drop of control solution. Hold the strip in the drop until the meter beeps.
- Compare your result with the range printed on the test strip bottle or carton.
6. Technical Information
Error Messages
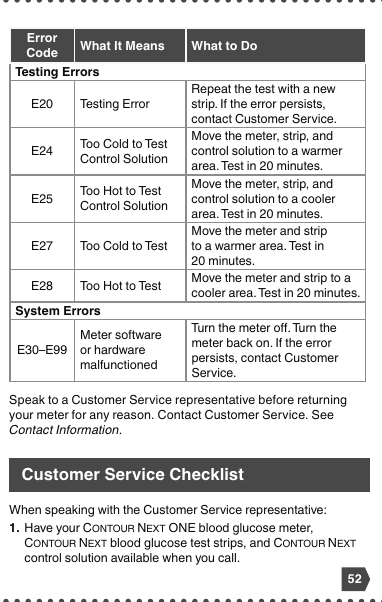
| Code | Meaning | Action |
|---|---|---|
| E1 | Temperature out of range. | Move meter to operating range and retest. |
| E2 | There was a problem completely filling the test strip. | Retest using a new test strip. |
| E3 | The meter is sensing a used test strip or the wrong control solution was used. | Retest using a new test strip. |
| E11 | Abnormal result. | Retest using a new test strip. |
| Battery icon | Battery is low and must be replaced. | See Replace Meter Batteries. |
If a problem cannot be resolved with these steps, call Customer Service at 1-800-348-8100.
Order Meter Kit Supplies
Order replacement supplies (test strips, control solutions, lancets) directly from shop.ascensiadiabetes.com or by calling Customer Service.
Meter Specifications
- Test sample: Fresh capillary whole blood from the fingertip.
- Test result: mg/dL or mmol/L (preset).
- Test time: 5 seconds.
- Memory: Up to 800 results.
- Battery: 1 x CR2032 (3V lithium).
- Operating temperature range: 41°F to 113°F (5°C to 45°C).
- Connectivity: Bluetooth Smart (Bluetooth Low Energy).
Contact Information
Customer Service: 1-800-348-8100
Monday through Sunday, from 8:00 am through 12:00 Midnight, Eastern Time. If this is a medical emergency, please contact your health care professional or dial 911.
Distributed by:
Ascensia Diabetes Care US Inc.
5 Wood Hollow Road
Parsippany, NJ 07054
www.diabetes.ascensia.com
For information on patents and related licenses, see: www.patents.ascensia.com
Trademarks: Apple, the Apple logo, and the App Store are trademarks of Apple Inc. Google Play and the Google Play logo are trademarks of Google LLC. The Bluetooth® word mark and logos are registered trademarks owned by Bluetooth SIG, Inc. Ascensia, the Ascensia Diabetes Care logo, Clinilog, Contour, the No Coding logo, smartLIGHT, and Second-Chance are trademarks and/or registered trademarks of Ascensia Diabetes Care Holdings AG. All other trademarks are the property of their respective owners.
Prefer to print or save offline?
Download CONTOUR® NEXT ONE User Guide (PDF)